
How To Setup Epson Printer To Mac? (Full Guide)

Have you bought a new Epson printer? Do you want to learn the setup procedure? Well, that’s a good idea. A new Epson printer user can find it difficult to use their printer, especially when they have no idea about how to setup Epson printer to Mac. Luckily, this post will help you learn how to setup your Epson printer wirelessly. So, sit back, relax, and read this blog right away. Follow the steps provided in this write-up, and you will have a successful setup.
Will your Epson printer help you print your documents wirelessly? But how? I am a certified printer expert, and I can help you setup your printer on a Mac computer. Read this post and try a test page to see if your printer is printing and scanning successfully. Let’s get started with the process and begin printing from your printer with ease.
Step 1: Unpacking the Epson Printer Box
The first thing to do is move to your brand-new printer box. Unpacking the box is the first and the most essential step. Take a look at the instructions below and unbox your printer carefully.
- Go to your Epson printing device box.
- Now, make sure to remove the protective coverings.
- Remove tapes and covering from both inside and outside.
- Next, ensure that your printer comes with no defects or damage.
- After that, look for accessories such as a USB cable, power cord, or other things.
- If you find any items defective or missing, contact the manufacturer right away.
Thus, you have unpacked your printer, and it is ready to setup. In the next section of this blog, you will find the setup for installing the device.
Step 2: Installing the Epson Printer
Without proper installation, you can’t use your printer. Do it properly with the instructions and steps below.
- Bring out your printer from the box.
- After that, find a safe, cool, and dry place.
- Keep your printer closer to the power outlet.
- For more, you can contact the support team and get a free consultation.
This way, you have installed your printer on your favorite palace. Turn it on and then execute the following steps. Also, you are in the midway of learning how to setup Epson printer to Mac.
Step 3: Connecting Your Epson Printer to Wi-Fi
After you install your printer, you will need to turn it on and connect it to Wi-Fi. Since WPS is one of the most simple methods of wireless connection, try this one. Moreover, these are the steps to make a connection.
- Initially, make sure that your printer and router include a WPS button.
- After assuring, switch on your printer.

- Thereafter, place your printer in the range of the network.
- Move back to your router, then.
- Next, look for the WPS button on it.

- Once you find the button, click on it.
- After that, move back to your printer.
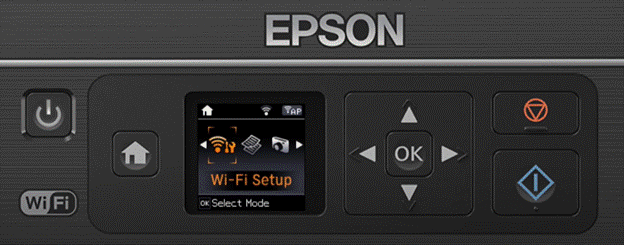
- In order to select a Wi-Fi Setup, first click on the Home button.
- Select the Wi-Fi Setup option available.
- Now, tap the OK button available.
- In the next step, click on the WPS button and tick mark the OK box.
- Follow all the prompts available on the screen to make the connection.
Thus, your printer has connected successfully to the Wi-Fi network. Now, you will need to add your printer to a Mac computer. Find the steps for it below.
Step 4: Connecting Epson printer to a Mac Computer
Looking for how to add Epson printer to Mac? The printer connects to a Mac and enables users to print their documents wirelessly. To do this, use the Epson Connect printer setup utility app. Continue with these easy-to-follow steps.
- On your Mac computer, open the web browser you want to use.
- Next, move your cursor to the search bar on the screen.
- Start to download the Epson Connect printer setup utility app on your system.
- After that, allow the application to run.
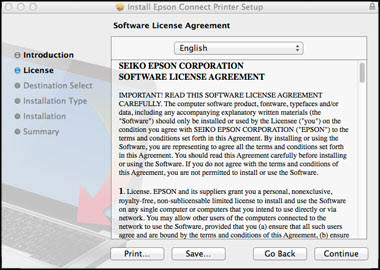
- Now, click the Continue option.
- In the following step, tap on Install.
- Then, find the Agree to Accept the Terms and Conditions box.
- After you install it, select your printer model.
- Thereafter, tap OK.
- Next, move forward after selecting the Printer Registration option.
- You will then see a box with the Register a Printer to Epson Connect option.
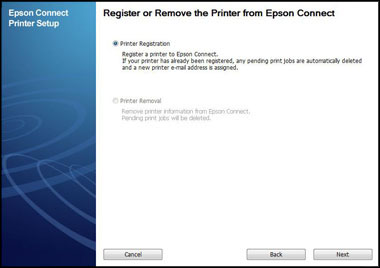
- Look at the terms and conditions given, then click Next.
- Finish the printer setup completely.
- A new user needs to create a new Epson Connect account.
- Existing users need to click I already have an account option.
- Lastly, remember to close the page.
If you want to enable scan for cloud and printer services, select activate scan for cloud and remote print option. After the Epson printer connects to the Epson Connect, you can move to the Settings option. Next, select the wireless connectivity option, which is Wi-Fi on your system. Hope you have learned how to setup Epson printer to Mac.
Step 5: Print a Test Page to Confirm the Setup
This is the final step you need to take. To get started, take some random files and take a step closer to your printer. Then, click on the print option available. If you find any troubles in printing, go back and check if you have done the setup correctly.
So, you have setup your Epson printer smoothly. The time has now come to use your printer on a Mac computer. Print the document you need at the moment.
Conclusion
Epson printer is a well-known device in the printing industry. With this printer model, users can print their documents efficiently. Moreover, it works great with a Mac computer. So, if you want to print from your printer connected to a Mac system, just learn how to setup Epson printer to Mac. Above all, you can see the major steps to setup an Epson on a Mac computer. So, set your printer the right way and print the document you need.
Are you failing even after learning how to
connect a printer to a Mac? When your printer fails to connect with a Mac
system, there can be many reasons behind this issue. Some of them are given
below.
●
Your printer or Mac system is
having issues.
●
Unstable internet connection.
●
Printer driver issues.
If you are dealing with connection issues, update Epson printer drivers and then try to connect your device.
Bluetooth connection is among the
simplest methods of connecting a printer. The steps are easy to follow, and the
method is time-saving. So, learn how to
setup Epson printer to Mac below.
- Go to the Apple menu on
your Mac.
- Then, click
on System Preferences.
- Navigate to
the sidebar and tap on Bluetooth.
- After that,
turn on Bluetooth
- Then, go to Printers and Scanners.
- Now, hit the
Add button
- Find your
printer available in the list.
- Finally, tap on Add.
Yes, you can use this app to setup your
printer on a Mac device. The app prints and scans files from a Mac system. One
thing to note is that this app is made especially for Epson printers. Set your
printer on a Mac and print the document you need. In addition, you can scan a
file using this app and upload it to another location, such as a cloud account.
 • Jan 19, 2026
How To Add Canon Printer To Windows: A Detailed Guide


 • Oct 13, 2025
How To Scan From Brother Printer To Computer: Full Guide
• Sep 25, 2025How To Fix A Canon Printer Not Printing? (Tutorial Steps)
• Jan 19, 2026How To Add Canon Printer To Windows: A Detailed Guide
• Oct 13, 2025How To Scan From Brother Printer To Computer: Full Guide
• Sep 25, 2025