
How To Connect Brother Printer To Wi-Fi? (Easy Methods)

Are you looking for an easy way to connect your Brother printer to Wi-Fi with a cable? Then, you are in the right place because, in this guide, we will answer the question asked by many: how to connect Brother printer to Wi-Fi with cable on Windows and Mac. For a better understanding, we will explore the detailed roadmap for connecting a Brother printer to a Wi-Fi using a cable. We will also cover other topics with some troubleshooting tips along with FAQs. So, without further delay, let's get started.
Prepare to Connect the Brother Printer to Wi-Fi Using a Cable
There are some essentials required to successfully connect the Brother printer to Wi-Fi using the cable, including a Brother printer, Windows or a Mac device, and an ethernet cable. Once you manage to gather devices and ethernet cables, it will be time to download and install the updated Brother printer. Without them, your printer wouldn't work at all. Follow these simple guided steps to download and install Brother printer on your system.
- Visit the official website of Brother printer.
- Select the "Support" option from the navigation bar, then select "Software & Driver Downloads."
- Now, enter your Brother printer model and click on search.
- Next, select the search results that match your printer model.
- Select the operating system and version that you are currently using.
- Then, click OK and choose a driver's pack.
- Lastly, read the essential information and click on "Agree to the EULA and Download."
![]()
Now, your Brother printer driver will start to download on your system. Follow the easy guided steps below to install the driver pack successfully.
- Select the just-downloaded Brother printer driver file and run it as an administrator by right-clicking on it.
- Now, follow the on-screen instructions and select the options that suit your requirements.
- Lastly, finish the installation and restart your system so your brother can make the necessary changes.
Once you manage to gather all the essentials for connecting your Brother printer, then it's time to move on to methods for practicing wired connection with Wi-Fi.
Method 01: Connect Brother Printer to Wi-Fi with Cable (Windows)
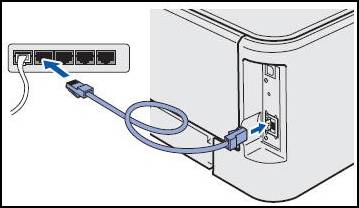
Step 1: Start by preparing the Ethernet cable for the printer connection.
- Use an Ethernet cable or USB cable, depending on your setup.
- Next, insert A-end into your Windows device and B-end into your Brother Printer.
Step 2: Now, power on your Brother printer.
Step 3: Setup the printer on your Windows Device
- Open the "Control Panel" on your Windows device.
- Then, click on “Devices and Printers.”
- Next, select "Add a Printer," then "Add a Network," and then “Wireless or Bluetooth Printer.”
- Select your Brother printer from the available device list.
- Lastly, follow some of the on-screen instructions to complete the setup.
Step 4: Finally, run a print a test page
- Go to the "Devices and Printers" window.
- Then, select your Brother printer by right-clicking on it, then select Printer Properties.
- Lastly, click on "Print Test Page" to confirm the connection is successful.
Method 02: Connect Brother Printer to Wi-Fi with Cable (Mac)
Step 1: Similarly to Windows steps, start the connection by preparing the Ethernet cable for the printer connection.
- Insert A-end into your Mac device and B-end into your Brother Printer.
- Then, turn on your Brother printer and your Mac.

Step 2: Next, open "System Preferences" on your Mac
- First, click on the Apple Menu, then open System Preferences, and then open Printers & Scanners.
Step 3: Now, add your Brother printer to your Mac
- Take a look at the Printers & Scanners windows and click the "+" button from the left-side printer list.
- Once you see the list of available devices, select your Brother printer.
Step 4: Later on, Select the correct printer driver
- Take a look at the dropdown menu; you will see the "In the Use" column; select it.
- Then select “Brother printer model + CUPS.”
- Lastly, click the "Add" button to finish the Brother printer driver setup.
Step 5: Finally, run a test print page
- Open the Printers & Scanners following the step 2 instructions.
- Now, select your Brother printer from the left side of the screen
- Click on “Open Print Queue.”
- In the print queue window, click on the printer and select Print Test Page from the top menu.
Troubleshooting Tips
If you follow our guided steps and are still having trouble connecting Brother printer to Wi-Fi with cable. Then, follow our useful troubleshooting tips to resolve the printer connectivity issue:
Reinstall Brother printer drivers.
Using outdated or corrupted drivers is one of the main reasons for intervening in printer connection. The solution to this is to uninstall the drivers and reinstall the latest available drivers for your printer model.
Update printer firmware.
Sometimes, other than the printer drivers, firmware also becomes the reason for creating connective issues in Brother printers. The solution to this is to follow the same steps as printer drivers but select the available firmware underneath from the driver search result and install it.
Restart your router and printer.
However, if you feel there aren't any problems with the steps or the system, then there might be a chance the connection issue comes from a bug. The solution to this is to give a quick restart to both devices.
However, the answers
to this question really depend on the printer model. But most of the Brother
printer cable ports are underneath the scanner cover. To access the port, you
need to lift up the cover, which is usually marked with a USB symbol.
With Brother
Printers, you receive comprehensive support from USB and Ethernet ports to
connect the printer to your computer. However, just like we stated earlier, the
port placement might be quite different in each based on the models.
Yes, you can connect
your Brother printer to Wi-Fi without the cable. In order to do so, you can use
the Wi-Fi Protected Setup (WPS) method. This is an easy method to follow up,
allowing you to operate printing without the mess of wires.
 • Jan 19, 2026
How To Add Canon Printer To Windows: A Detailed Guide


 • Oct 13, 2025
How To Scan From Brother Printer To Computer: Full Guide
• Sep 25, 2025How To Fix A Canon Printer Not Printing? (Tutorial Steps)
• Jan 19, 2026How To Add Canon Printer To Windows: A Detailed Guide
• Oct 13, 2025How To Scan From Brother Printer To Computer: Full Guide
• Sep 25, 2025