
How To Add Canon Printer To Windows: A Detailed Guide

learn ‘how to add Canon printer to Windows wirelessly’. Here, you’ll learn everything in detail about the connection process. Before starting with the steps, I want to tell you that I have been a ‘Canon printer’ user for many years, and now I want to teach all users like you who want to get started with their Canon printers.
I know how important it is to have a printer at home and in the workplace. No matter which field you’re in, you always need a printer to finish your tasks and assignments if you’re a student. Therefore, I will be teaching you about the wireless printer connection. So, stay connected to this blog to learn everything here.
How to Connect Canon Printer to Wi-Fi?
Before you add Canon printer to Windows, you must know the connection steps to connect your printer to Wi-Fi. Here are the steps to connect your printer to a wireless network. You can use these steps to connect your printer to your computer.
Method 1: With the WPS Button
When it comes to a wireless connection, the method is not limited to a single method; instead, it is diverse and can be used according to your preferences. So, the WPS button method is one of the preferred methods for adding a printer to your computer. Check out the steps below:
- In the first step, power on your printer and click on the Settings option on the printer using the arrow keys.
- Then, hit the Wireless LAN setup option on your printer screen.
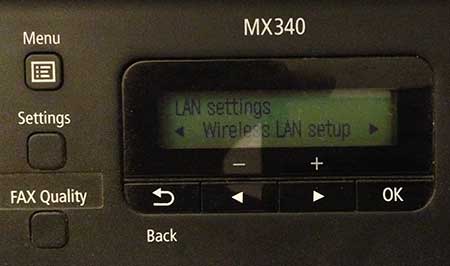
- After that, press the OK button and move on to the WPS push button via the arrow keys on your printer’s screen.
- Tap the OK button, and you’ll see a notification about the connection on your printer’s screen.
- In the further steps, head to your router and click the WPS button.
- A message will appear on your printer’s screen once the setup is complete.
- Lastly, you can freely set up your printer on a device.
That’s ‘How to Connect a Canon Printer to Wi-Fi’. You can now move on to the next method to set up a wireless connection with your printer.
Method 2: Using the WPS PIN Code
If you want to connect your printer to Wi-Fi via WPS PIN, you can do it using the following steps. Let’s check out those steps here:
- To start, insert the letter-sized paper into your printer.
- Then, move on to the Control Panel on your printer and click the information button.
- Now, you’ll land on the network configuration page with your PIN code.
- After that, press the Setup button about 10 times.
- Next, click on the Color button on the printer.
- Head to your computer, follow the on-screen instructions, and set up a WPS PIN code.
- In the further steps, you’ll notice a network status on your printer.
- Finally, your printer is set up on a wireless network.
That’s how one can connect Canon printer to Wi-Fi and start printing.
How to Add Canon Printer to Windows?
When you have connected your printer to a wireless network, you’re good to go to add your printer to a Windows computer. Let’s check the steps below.
Method 1: Through a USB Connection
Want to learn how to connect your printer to a Windows computer via USB, if yes then use the following steps to proceed:
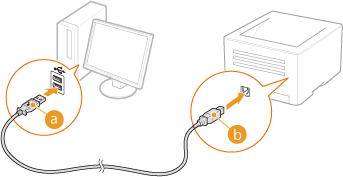
- First of all, connect the ends of your USB cable to both of your devices.
- Then, verify that your printer is connected to a power supply.
- Now, power on your printer.
- Finally, you can download and install some important printer drivers.
This is the first step that you can choose to connect your printer to a Windows computer.
Method 2: Via a Wi-Fi Network
Learn How to connect your printer wirelessly to a Windows computer, you can try the steps given below:
- In the first step, ensure that your printer is powered on and in the range of Wi-Fi.
- Go to your printer’s control panel and find the Wi-Fi setup menu.
- Now, select your Wi-Fi network from the network’s list.
- After that, enter your password for the wireless network.
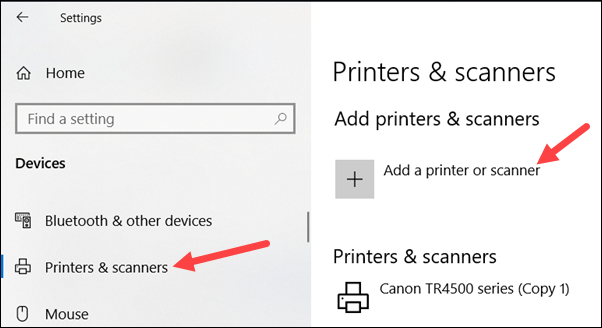
- In the next step, open Settings on your computer.
- Then, locate the Printers & scanners option.
- Select the Add a printer or scanner option and pick your printer from the list.
- Next, install the required printer drivers.
- Print a page to verify the connection.
This is ‘how to add Canon printer to Windows’ easily and start printing.
Conclusion
We have discussed everything about adding your Canon printer to your Windows computer. A wireless connection is mostly preferred when setting up a printer connection. Having used this printer extensively, I highly recommend it for its adaptability to different connection methods. To add your printer on a Windows PC, you can go to Settings on your computer.
Learn how to add canon printer to a MacBook, Check out the following steps;
- To start, head to the Apple menu.
- Then, move on to the System Settings.
- Now hit the Printers & Scanners.
- After that, choose your printer under the Printers option.
- When you see your printer, hit Add.
There could be many reasons why your printer cannot connect to your computer. The primary reason is when correct Canon printer drivers aren’t installed or are outdated. If your printer faces such issues, try resolving them by updating the drivers and restarting your PC and printer.
If you want to add your printer manually to Windows 10, follow these steps:
- To start, hit the "Start button" and choose the Settings option.
- Then, go to the Devices option and click Printers & Scanners.
- After that, hit the Add a printer or scanner option.
- 4. Now, let your PC find the available printers, select the one you need to use, and hit Add device.
- However, if you want to remove your printer sometimes, you can simply choose the Remove option.
 • Jan 19, 2026
How To Add Canon Printer To Windows: A Detailed Guide

 • Oct 13, 2025
How To Scan From Brother Printer To Computer: Full Guide
• Sep 25, 2025How To Fix A Canon Printer Not Printing? (Tutorial Steps)
• Oct 13, 2025How To Scan From Brother Printer To Computer: Full Guide
• Sep 25, 2025How To Fix A Canon Printer Not Printing? (Tutorial Steps)
 • Sep 05, 2025